
Impact Reporting Period Checklist
Ready to begin creating reports, but not sure where to start? We've got you covered! This checklist is the ideal order of operations for each reporting period in Impact. You may choose to handle these steps in a different order if needed.
1. Set the Recipient Reporting Period
Recipient reporting periods are used for ensuring imports for recipient impacts are associated with the correct active recipient reporting period.
Each new fiscal year, you will want to review this information before uploading new recipients.
Instructions: Administration: Manage recipient reporting periods
2. Review Your Funds
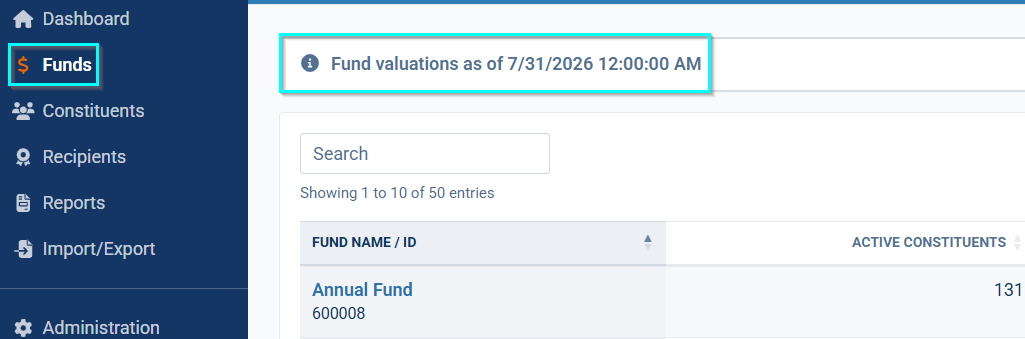
Fund data automatically flows nightly into Impact from Balance and all open funds are included. On the Funds page in your Impact database, you'll see the latest fund valuation date - ensure this covers through the date range for your new reporting period.
Want to exclude funds from Impact?
Instructions: How to Exclude Funds from Impact (Exclude Funds Import)
Impact-Only Customer?
Time to upload your fund financial activity data.
Instructions: Impact Only Customers: Fund Financial Activity Import Setup Guide
3. Imports
Next you'll want to import your recipient and constituent data for the reporting period. Below is the order we recommend, but feel free to stray from this guide as needed.
Pro Tip: This is also a good time to start reviewing the Template Guide, which will give you insight into different page designs, character limits, image sizing guidelines, etc. This guide can help you determine which impact statement pages to include in your report packages and provides guidelines for your team while collecting copy and imagery from recipients.
The Template Guide is located in your database on the Reports page. Select the Report Templates tab then click the 'Create new report template' button and you'll have the option to download the guide. You can download the guide from an existing report template as well, and it's also attached to the following article for easy access: Creating a Report Template: Step by Step Guide
Recipient Impact Statements
You'll want to import recipient statements first. There are several layout options for displaying impact information that you may choose from.
Not sure which recipient impact statements to use? Check out these examples: Impact Statement Template Page Examples
Instructions:
Imports: "Recipient Page Fund Recipients" File
Imports: "Recipient Page Fund Bullets" File
Imports: "Thank You (vertical)" file
Imports: "Thank You (horizontal)" file
Imports: "Q&A Page Submission" File
Imports: "Narrative and Quote" file
Bulk Upload Recipient Photos
We have an import to upload recipient photos in bulk. These photos will be matched with recipient and fund IDs and populate on impact statements (i.e. Q&A, Thank You letters, and Narrative & Quote). This step needs to be completed after you've uploaded your recipient impact statements, but before they are approved.
Instructions: Bulk Image upload (Recipient photos)
Note: This step needs to be completed by an Impact support or implementation team member once you've gathered the photos and populated the appropriate template.
Approving Recipient Submissions
Once you have uploaded your recipient import files (and bulk recipient images if applicable), it's time to review, edit, and approve them. You do not need to approve Recipient Page Fund Recipients or Recipient Page Fund Bullets files.
Navigate to the Recipients page in your database. On the Recipient collection tab, you will be able to review your imported recipient impact statements and approve, reject or mark incomplete.
To review the impact statement, click into the Recipient Name. There you will be able to upload a recipient photo (if needed), review their statement and preview what the page will look like. Once you are satisfied with the look of the impact statement, you can "Approve" it. Note: The recipient impact statement must be approved to show in an Impact report.
Constituent Information
- If you do not have the RE NXT Integration, you will use the Constituent Import Default import to upload active constituents into Impact for reporting.
Instructions: Imports: "Constituent Default" file- Raiser's Edge NXT Integration
If you have the RE NXT integration, your constituent information will be automatically synced with Impact. This process is triggered by adding the "Fundriver Impact" attribute (or Custom Field) to a constituent's record in Raiser's Edge. Once added, the constituent will sync during the next nightly feed.
- Raiser's Edge NXT Integration
- The next step is to associate each constituent with the appropriate fund(s) using the Fund to Constituent Relationship import. This file should a FULL file of all constituent to fund relationships (If you import a partial file, that will replace what is in Impact)
Instructions: Imports: "Fund to Constituent Relationship" file
4. Create Report Templates
Now it's time to create your report templates. You can choose which pages to include and in what order, add text and default photos, and run proofs to preview your template. There is a handy template guide available to help you with character limits, imagery guidelines, formatting, etc.
Instructions: Creating a Report Template: Step by Step Guide
Note: You can start creating your report template(s) prior to importing recipient submissions. You will not be able to proof a template if including fund package pages (Financials page & recipient impact statements) until there is at least one fund with approved impact statements for each page type included.
5. Create Reports
Once your report templates are proofed and approved, and you've approved all recipient submissions, it's time to create your actual reports. In order to run a report, you must have an approved report template.
Instructions: Creating Reports: Step by Step Guide
6. Report Delivery
Once reports are created within Impact, you will need to determine the method in which reports will be delivered to your donors - print or electronic delivery. The report delivery flow will flag missing physical mailing or email addresses and exclude those constituents.
Instructions: Using Report Delivery
Need help? Our support team is with you every step of the way! Contact support.impact@evertrue.com or use the Support widget in your database for assistance.
Reply
Content aside
- 4 days agoLast active
- 14Views
-
1
Following